Creating HDR Images
Lightroom HDR versus Photoshop HDR Pro
I am a warm-weather namby-pamby. I take more outdoor, landscape images in the summer. Yes, although I know the first rule of landscape photography is "on sunny days open-sky photographs must only be taken at sunrise and sunset", I still take most of my shots during the day.The problem I have, as you will guess, is the light is too harsh; the darks are too black and the highlights are too white.
Thus I often bracket the exposure time of my shots to allow HDR processing to bring in the darks and lights and hopefully generate an acceptable full DR image to work from.
We all know Adobe Lightroom (LR) uses the same underlying engine as Adobe Camera Raw (ACR) which just happens to also be Photoshop's (PS) default RAW processor. Thus it makes no difference whether a RAW image is processed in PS/ACR or LR.
When Lightroom introduced HDR processing I just assumed that the engine for this would be the same as the one that Photoshop uses (where it is called HDR PRO.) Whether they are or are not the same I can't be certain but my conversions differ.
I processed a set of three images, handheld, taken at 0, minus 1 and 2/3 stops and plus 1 and 2/3 stops exposure time increments.
I used LR HDR to combine them into one 32-bit DNG. I then used PS HDR PRO to create one 32-bit PSD. I compared the results.
PS HDR PRO was the clear winner and worth the few extra seconds it takes.
These are the three RAW photos in my set: normal (0), (over) +1.6 and (under) -1.6 stops

I created the HDR in LR as follows...
- Select the image set
- Right click one of the selected images
- Choose PHOTO MERGE > HDR.
- In the popup HDR window select AUTO ALIGN and GHOSTING if needed, mine was hand held so I selected both, and auto settings is optional
- Click MERGE and the job is done.
Starting from within LR
Select the image set, right click one of the selected images
Choose EDIT IN > MERGE TO HDR PRO IN PHOTOSHOP

This will open Photoshop and open the HDR PRO window.

- Select REMOVE GHOSTS if it was hand held or needs deghosting.
- Select MODE to 32 bit
- Select COMPLETE TONING IN ADOBE CAMERA RAW
- You can select (tick) or deselect one or more images in your set, I used all three.
- If you have chosen to remove ghosts, highlight the image which will be used to choose the ghosted sectors. (also note: in my set selecting the over exposed image (EV +1.6) the sky had a cyan cast, but selecting the normal exposure (EV 0) image was OK.
- Click the TONE IN ACR to create the merged image and open it in ACR for additional work as desired (e.g. click BASIC > AUTO)
- Click OK to open the HDR image in Photoshop as a 32-bit PSD.
- Click FILE > SAVE and close the image to return back to LR, The HDR image will have been imported and ready for any additional post processing.

Comparing the LR and the PS HDR PRO results I have zoomed into the branches of both trees.
LR HDR version...

PS HDR PRO version...

(Click the images to view them in more detail)
There is clearly a much crisper rendition of the branches in the PS version. They are mushy in the LR version.
Similar results are evident in other parts of the photograph.
I know the sky is a different hue. I tried to match the images but failed. Colours can always be changed to taste in LR or PS.
But Are They Different Applications?
I am still in two minds that LR and PS use different HDR applications
First, it doesn't make sense that Adobe would develop a different HDR application when they wanted to add HDR to Lightroom. Surely they would simply lift the code from PS and slot it into LR.
Secondly, both methods (LR and PS) had exactly the same, small problem with the solitary duck, duplicating part of the duck to its lower left. In both LR and ACR this was quickly fixed with the HEALING BRUSH.
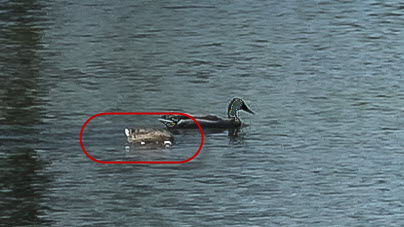
So I suspect they have the same underlying code, or at least many of the same components such as (I assume) the ALIGN module that produced the same half duck.
Thus different results could just be due to the user interface that drives the HDR code. We know the PS interface offers a different approach to set handling, so perhaps PS simply passes different default parameters to the HDR app to those that LR passes in. In this instance PS parameters produced better results.
Other HDR products are available
Different results would be obtained using other HDR software, e.g. Capture One, ON1, Photomatix, NIK, Aurora etc. But I am only working with LR and PS so I will now consider PS first before LR.
Dated: 22nd April 2019, using the current versions of LR and PS at that date.
Versions: LR is 8.2.1, ACR is 11.2.1, PS is 20.0.4
Camera: Fujifilm X-T2, RAF, 1/500, f/7.1 ISO 200. 35mm with the 18-55mm XF lens.